
I’ve made small progress on many different things today. Not as much as I wanted to get done, but I never do. The one thing I really wanted to get done was cleaning out my bedroom closet the rest of the way. There’s kind of a short story surrounding that, so I’ll try to keep it brief…
When we remodeled the back porch, there was a lot that needed done. It was a disaster. Everything was covered with cheap, thin paneling that may have been tempered Masonite™ at one point, but now brittle and crumbled in your hand. Not only did it cover the walls to the outside, but it also formed the bedroom closet walls. It had to go.
There was also a makeshift passthrough door in what was supposed to be a wall between the laundry room and the extra storage room off what became my bedroom. That extra room became data central. Not all at once, but over repeated incarnations to what it is now, each time to increase and better organize storage as well as provide better utility.
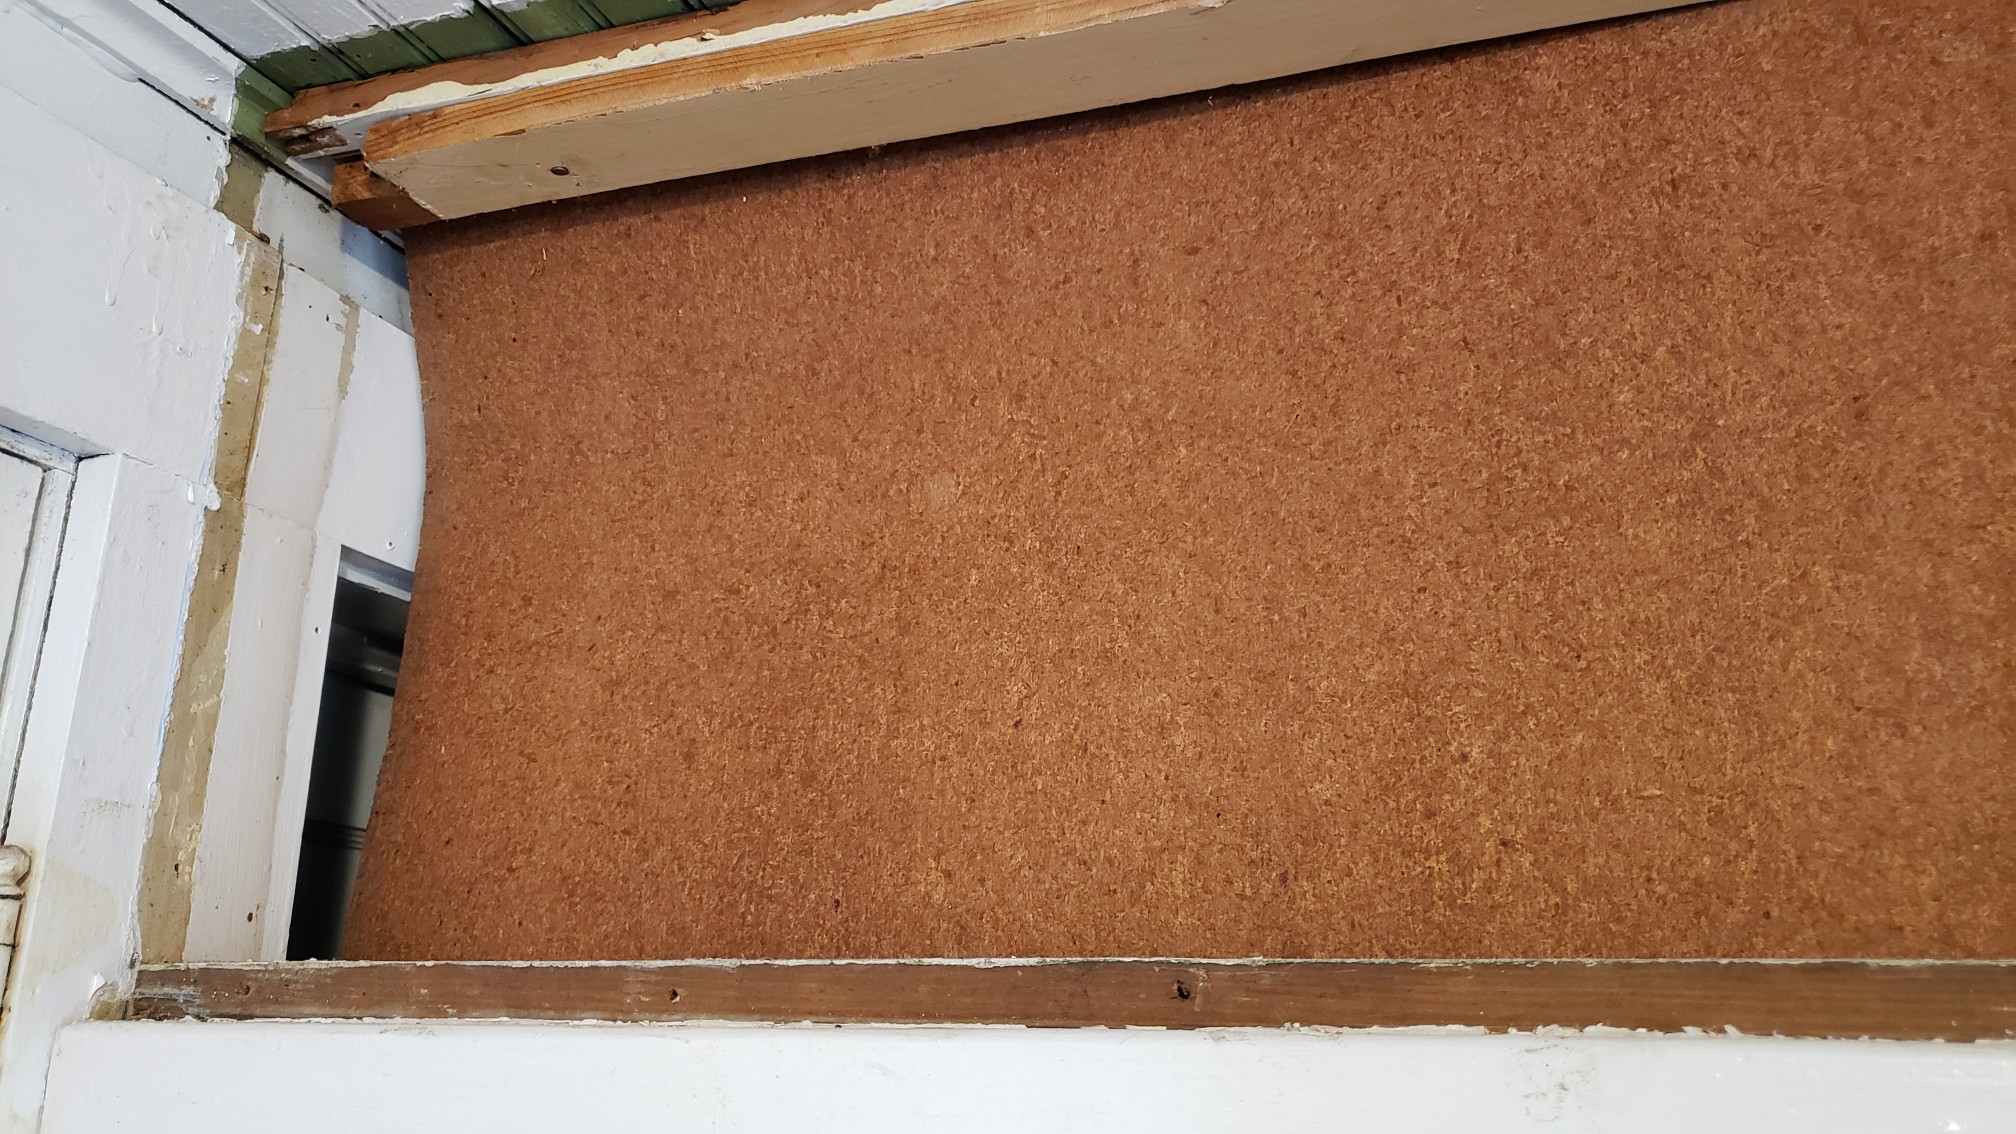
After tearing out all that crappy paneling, and the bedroom closets, and studs that framed them, it really became one big pass through until I rebuilt those closets. I used bead board, with the outside facing the back porch painted white, and the inside left as natural wood. I even used cedar for shelf cleats and the closet rod hangars. Absolutely beautiful!
Closet Lighting
The only thing missing is lighting. There was no provision for lighting in the original closets either. Probably a good thing too considering most of the house power came from one of those ancient, original knob-and-tube wiring feeds. One spark and all that crappy paneling would have lit up like tinder and burned the house down!
Ann got around it with a battery powered “tap” light stuck on the bead board ceiling in her closet. I could have installed light fixtures and surface type switches with that flat, snap conduit, but we had already completely rewired the house long before doing the back porch and rebuilding the closets. Battery power it is. Then it hits me…
Why not use an arrangement like the office lighting strip? I grabbed my tape measure and verified the closet is a little more than 38″ wide. Wide enough for one of the two segments in the LED office lighting. The only difference is the office lighting has a dedicated mains power supply supplying many amps, 6 or 8 amps @5 volts IIRC.
The closet lighting will need to run on rechargeable battery power with a limit of about an amp. I have a couple of leftover passenger car lighting 3D printed battery boxes, already wired up with a 2000 milliamp hour cell, ready to go. But that would only be temporary.

Another Lighting Controller?
Yes, another lighting controller. I really need a bigger switch, housed in a removeable box that can be moved to a charging station. I’m already behind the 8 ball on getting other 3D print designs finished and really don’t want to add yet another to the list. For now, just the ability to unplug the LED light strip from the controller box will be good enough.
I have enough of the extruded aluminum channels with diffusers to make up another segment. The nice thing about using a 3′ segment like the two that make up the 6′ light in the office is I can reuse everything from the office lighting sketch with minor modifications to the configuration and web page to support just half, 55 rather than 110 LEDs.
Each pixel has it’s own red, green, and blue LED, each consuming ~20mA each, plus whatever the consumption of the single control chip per pixel is. Let’s say 60mA per pixel as a nice round figure. The bad news is all 55 pixels on at the same time at “full tilt” will consume 3.3 amps at 5 volts! Our poor little passenger lighting setup will handle maybe 1 amp.
Thankfully the lighting controller can set them to ¼ power to bring consumption back under an amp. I was hoping to put together the new lighting segment tonight, but I forgot these extrusions are a meter long (39.36″), not 36″, and need cut to length. In any case, it’s a tomorrow thing.
It’s a Tomorrow Thing
My thought was just use the table saw with the miter gauge to trim the aluminum and diffuser to length together. Easier said than done with the garage in the state of disarray it’s in, stuff stacked on the table saw and strewn about the floor and everywhere. Hacksaw it is. A quick file to remove the burrs and it’s time to stick on the LED strip.
Once I’ve soldered the pigtail connector to the LED strip, I prep the extrusion with an alcohol pad then remove the protective strip from the double sided sticky backing, a little at a time, while placing the LED strip against the extrusion and pressing it down in place. With that done, it’s time to add the diffuser and end caps and give it a test.
I already modified the sketch config and HTML page to match the “half” office sized LED array last night. As I feared, the battery power gives out once a certain brightness threshold is reached, resetting the Arduino. Time to regroup. After some figuring, I decide to split the 55 LED strip into two, a main light of 30 LEDs, and an under shelf unit of 25 LEDs.
Another hack job, literally, with the hacksaw. Time to solder on another pigtail to the second LED strip and add a harness to another Arduino then program it for the second light strip. Also need to reprogram the original to have fewer LEDs and a new HTML control page as well. Those edits are fairly quick and my soldering job is soon tested.

It Ain’t Pretty
The original idea was to use one of the spare passenger car lighting battery boxes to power and control these things. But now that I need two of them, things are getting complicated. Add to that the tiny slide switch used to power on the unit is difficult to find, let alone know which way is on if accidently left on and the battery goes dead.
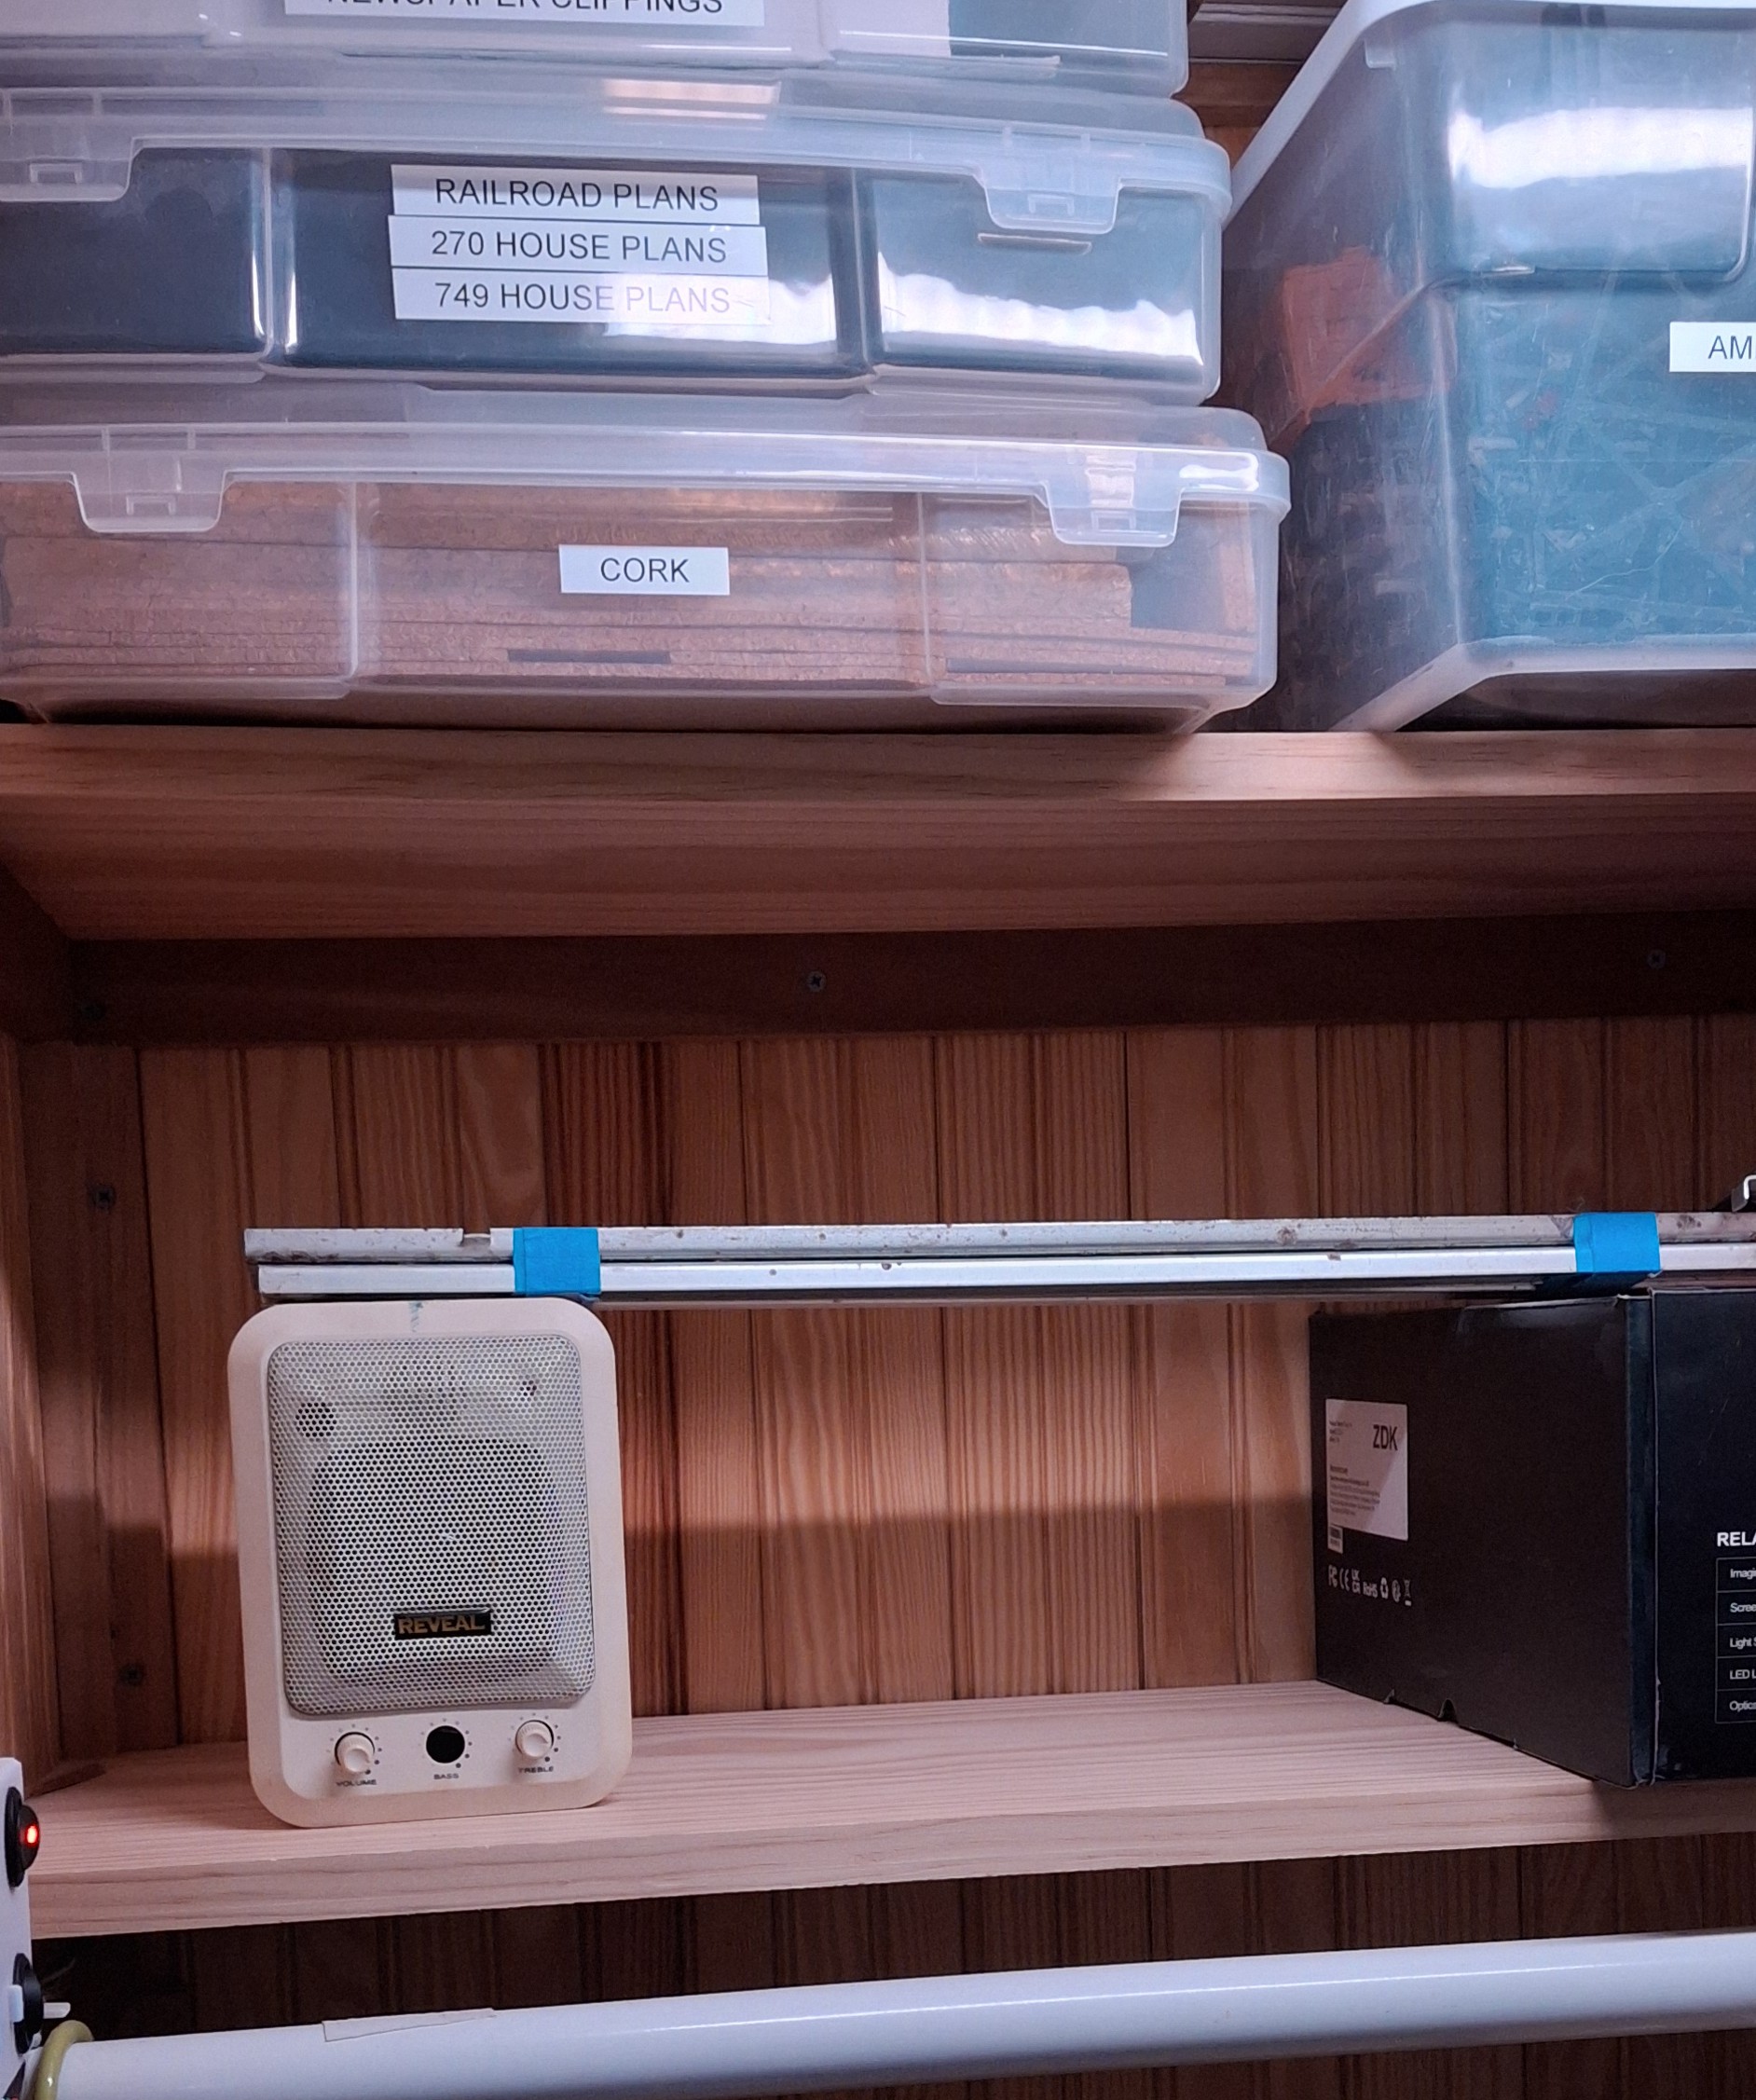
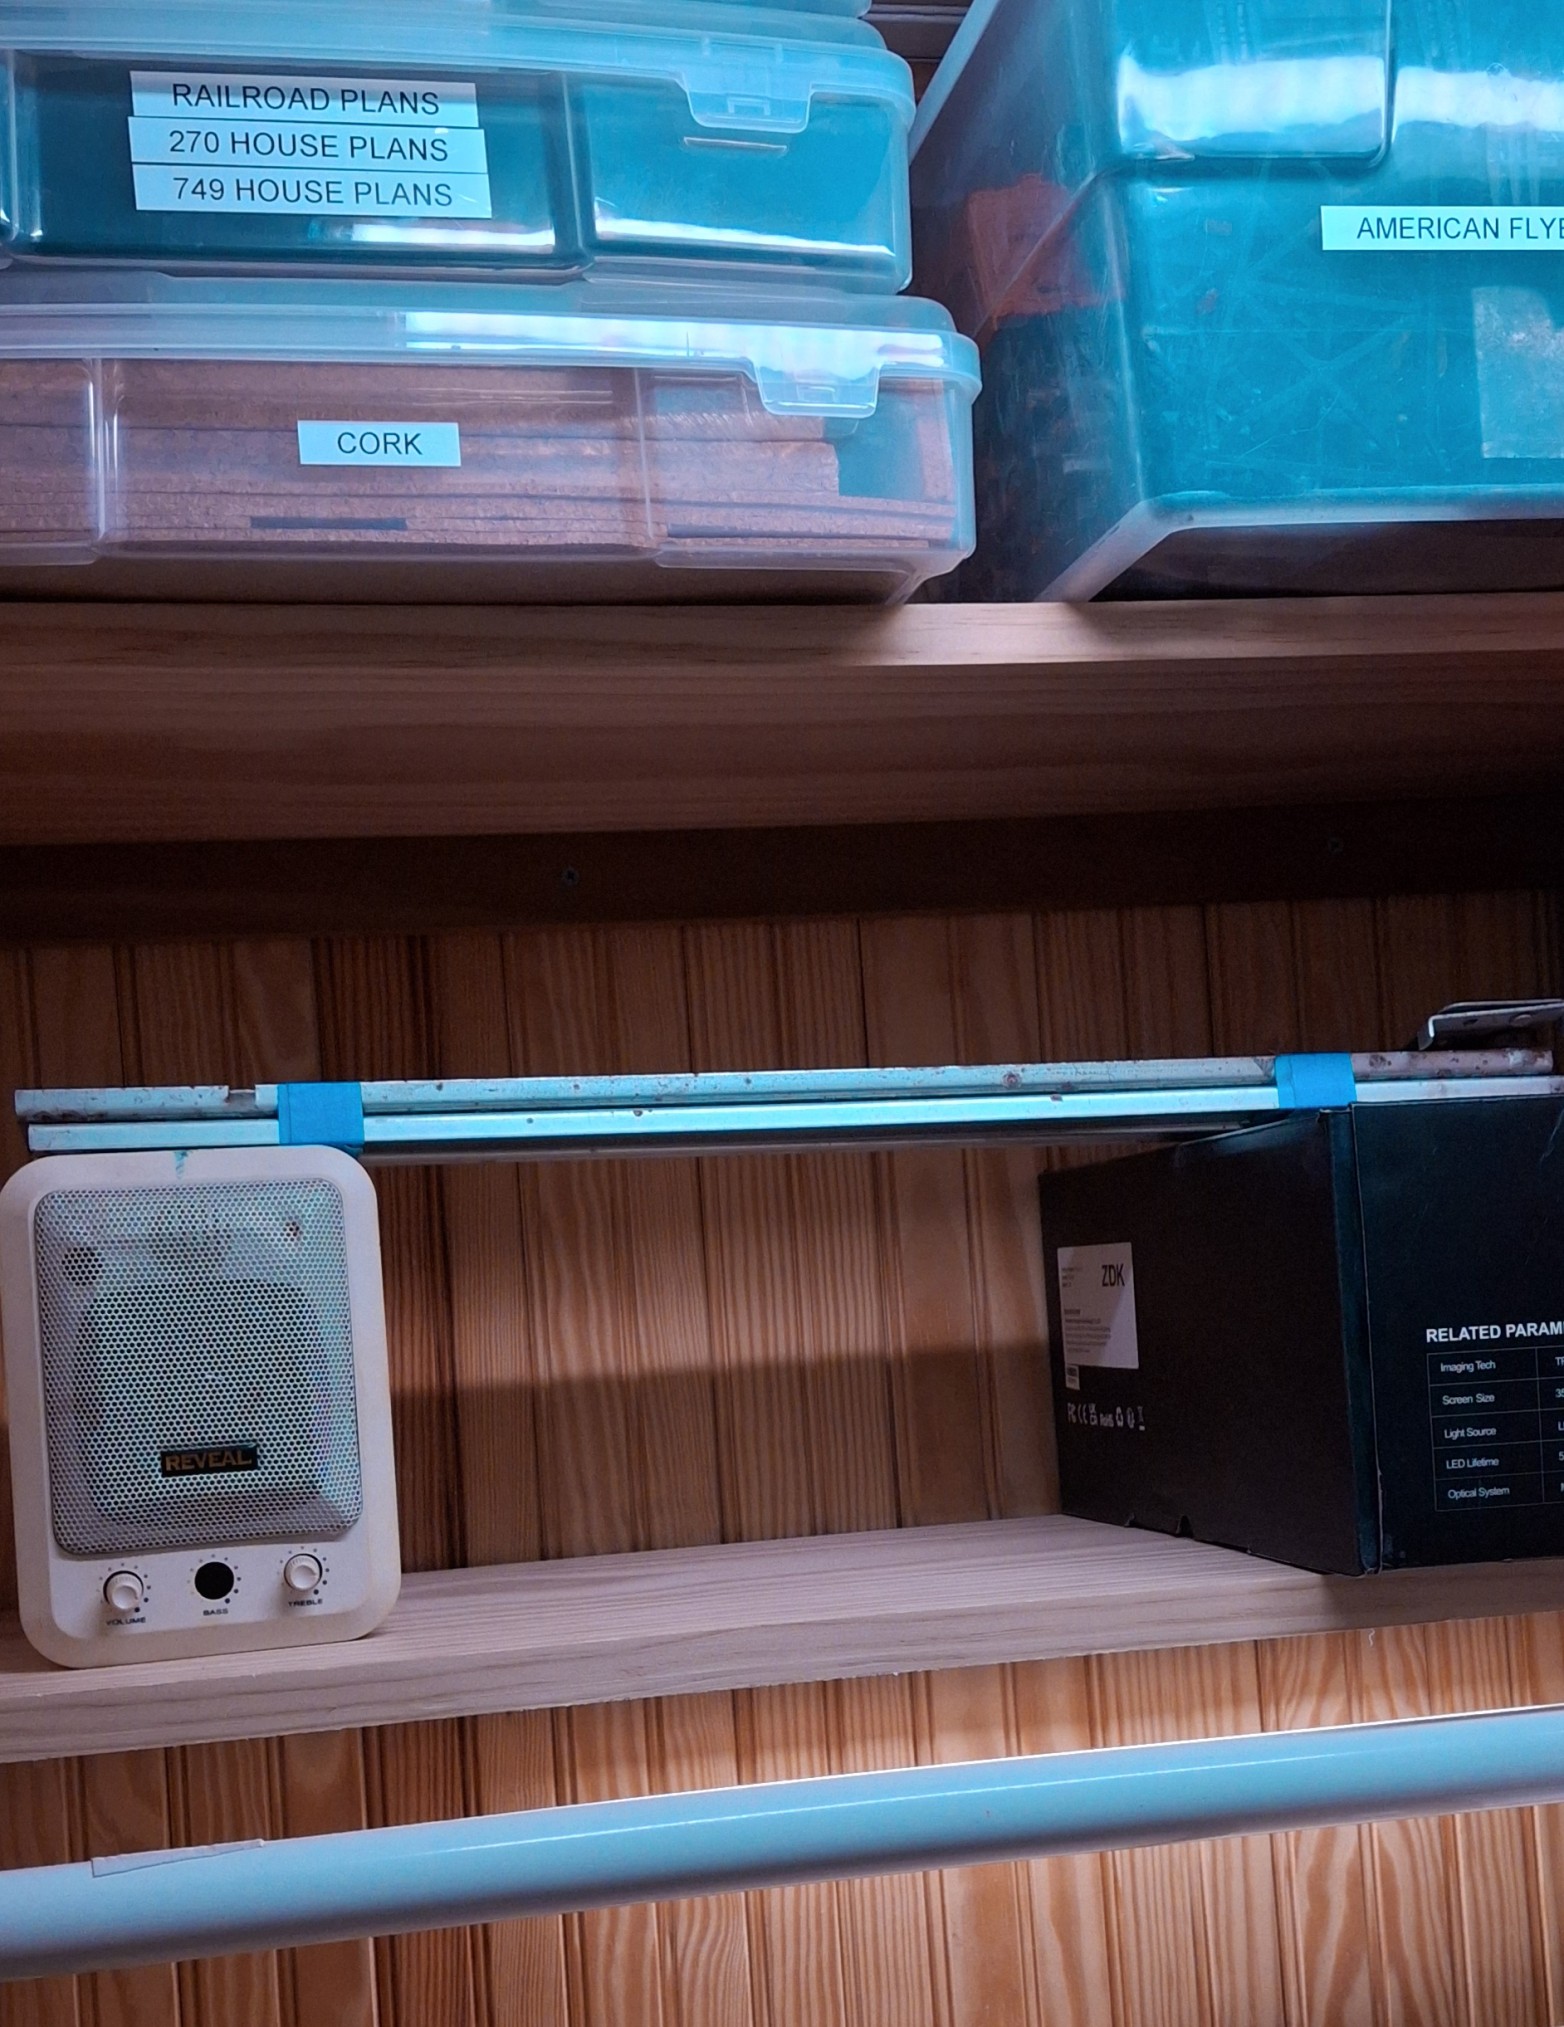
It’s not a deal breaker, but it could certainly be much more user friendly, and obvious which way is on. I used double sided tape to stick the battery box to the wall of the closet and routed the wiring harness I assembled to connect the LED strip to it. After drilling pilot holes and securing the mounting clips with screws, I snap the extrusion in place. Time to test.
It works great, but it ain’t pretty, and it suffers from all the drawbacks I already mentioned. Unfortunately, recharging it was an afterthought too. At least it became apparent it was once I realized where I stuck the box to the wall didn’t allow access to the existing charging port. Now I get to gut the thing and pull out the battery every time it needs recharged!
Add to that the placement of the LED strip at the top of the closet leaves a rather pronounced shadow beneath the shelves. That’s where the second strip comes in. It will mount beneath the shelves to illuminate anything beneath them. Once I attach the mounting clips and snap it in place that is.
Best Laid Plans
Originally I didn’t plan on a light under the shelves since all it would do is backlight the clothes hanging in front of it. Now that I’ve cleaned out the closet and donated everything that didn’t fit, I’m left with one polo shirt and my motorcycle boots. There’s no reason to leave that polo shirt hang in the closet and gather dust since I no longer need to wear it to work.
I work 100% remotely now and I’ve only needed that polo once since starting this job. So now it’s folded up in my dresser. Beyond all that, it’s not long before the gutting to recharge the battery renders the battery box inoperable. The original idea of reusing what I already have is quickly dissolving into a new design adventure.
Not what I wanted at all. In fact, it’s exactly what I wanted to avoid. Certainly nothing I have time for, but it needs done nonetheless. A couple of design decisions later and I have the the HUGE 10,000mAh batteries out along with their dedicated power bank charge controllers. After a few charge and discharge cycles, I remember why I mothballed these things.
It takes hours to get to 75%, then minutes to reach 98%, where they sit for a long time before reaching 99%, then 100%. They certainly don’t garner trust in the charging readings, being the finest quality Chinesium, but they do have a nice remaining charge display and can provide more than an amp of current.
New Designs?
Looks like I’m designing a new battery box with the dimensions of a standard switch box to hold the HUGE battery and switches big enough to be seen. The problem is I have so many different types of dedicated charge port (DCP) controllers, it requires multiple designs.
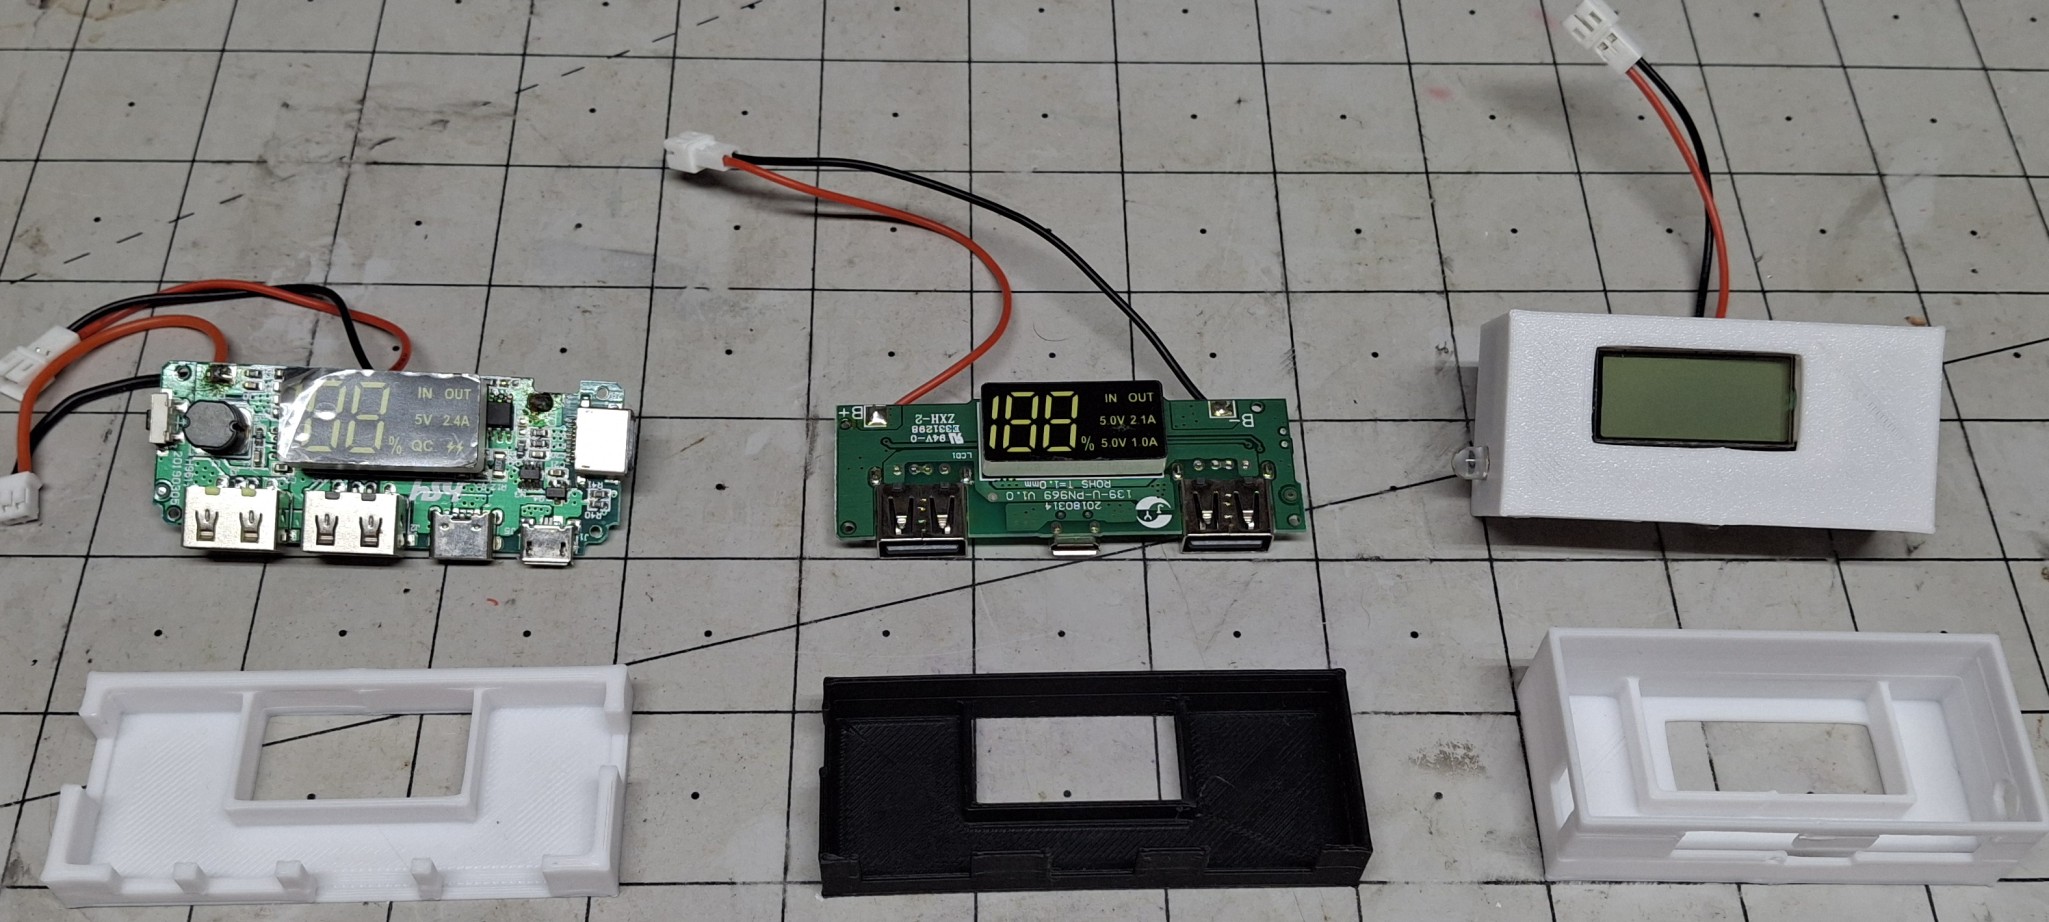
Basically I have three styles of DCPs to worry about. The first has one of those bright white LED “flashlights” that turn on when you press and hold the button. The next an older style twin USB A output with a single USB micro charge port. The third is a newer, high current twin USB A output with USB micro, USB C, and Lightning charging ports.
I chose the second style for the prototype design. The flashlight version is an LCD with a bright blue backlight but it suffers from the LCD off axis lack of viewability issue. The other two have bright white LED displays. Much easier to read without the off axis problem. The first iteration has half the access opening in the “case” and the other half in the “lid”.
The only problem with that earlier version is that to be able to provide access to the charge port from the bottom of the case, the wakeup button is on the opposite end from the outside of the case. After trial and error and three or four iterations trying to come up with a feasible mechanism to remotely push the button, nothing is working reliably.
Double Whammy
After trying to look up the specs on the unit, it becomes apparent it’s no longer available, superseded by the newer, high current version with more charging port options. So that coupled with the button on the wrong end is the double whammy. The newer unit has the button on the opposite end so it can be accessed from the outside of the case.
Not wanting to give up on the older version, I decide to go with a “universal adapter” approach where the case and lid have cutouts in the proper location for access to the USB A and charging ports, but the specific access port locations are contained in an adapter that attaches to the lid. It doesn’t seem all that important now, but boy am I glad I did it that way!
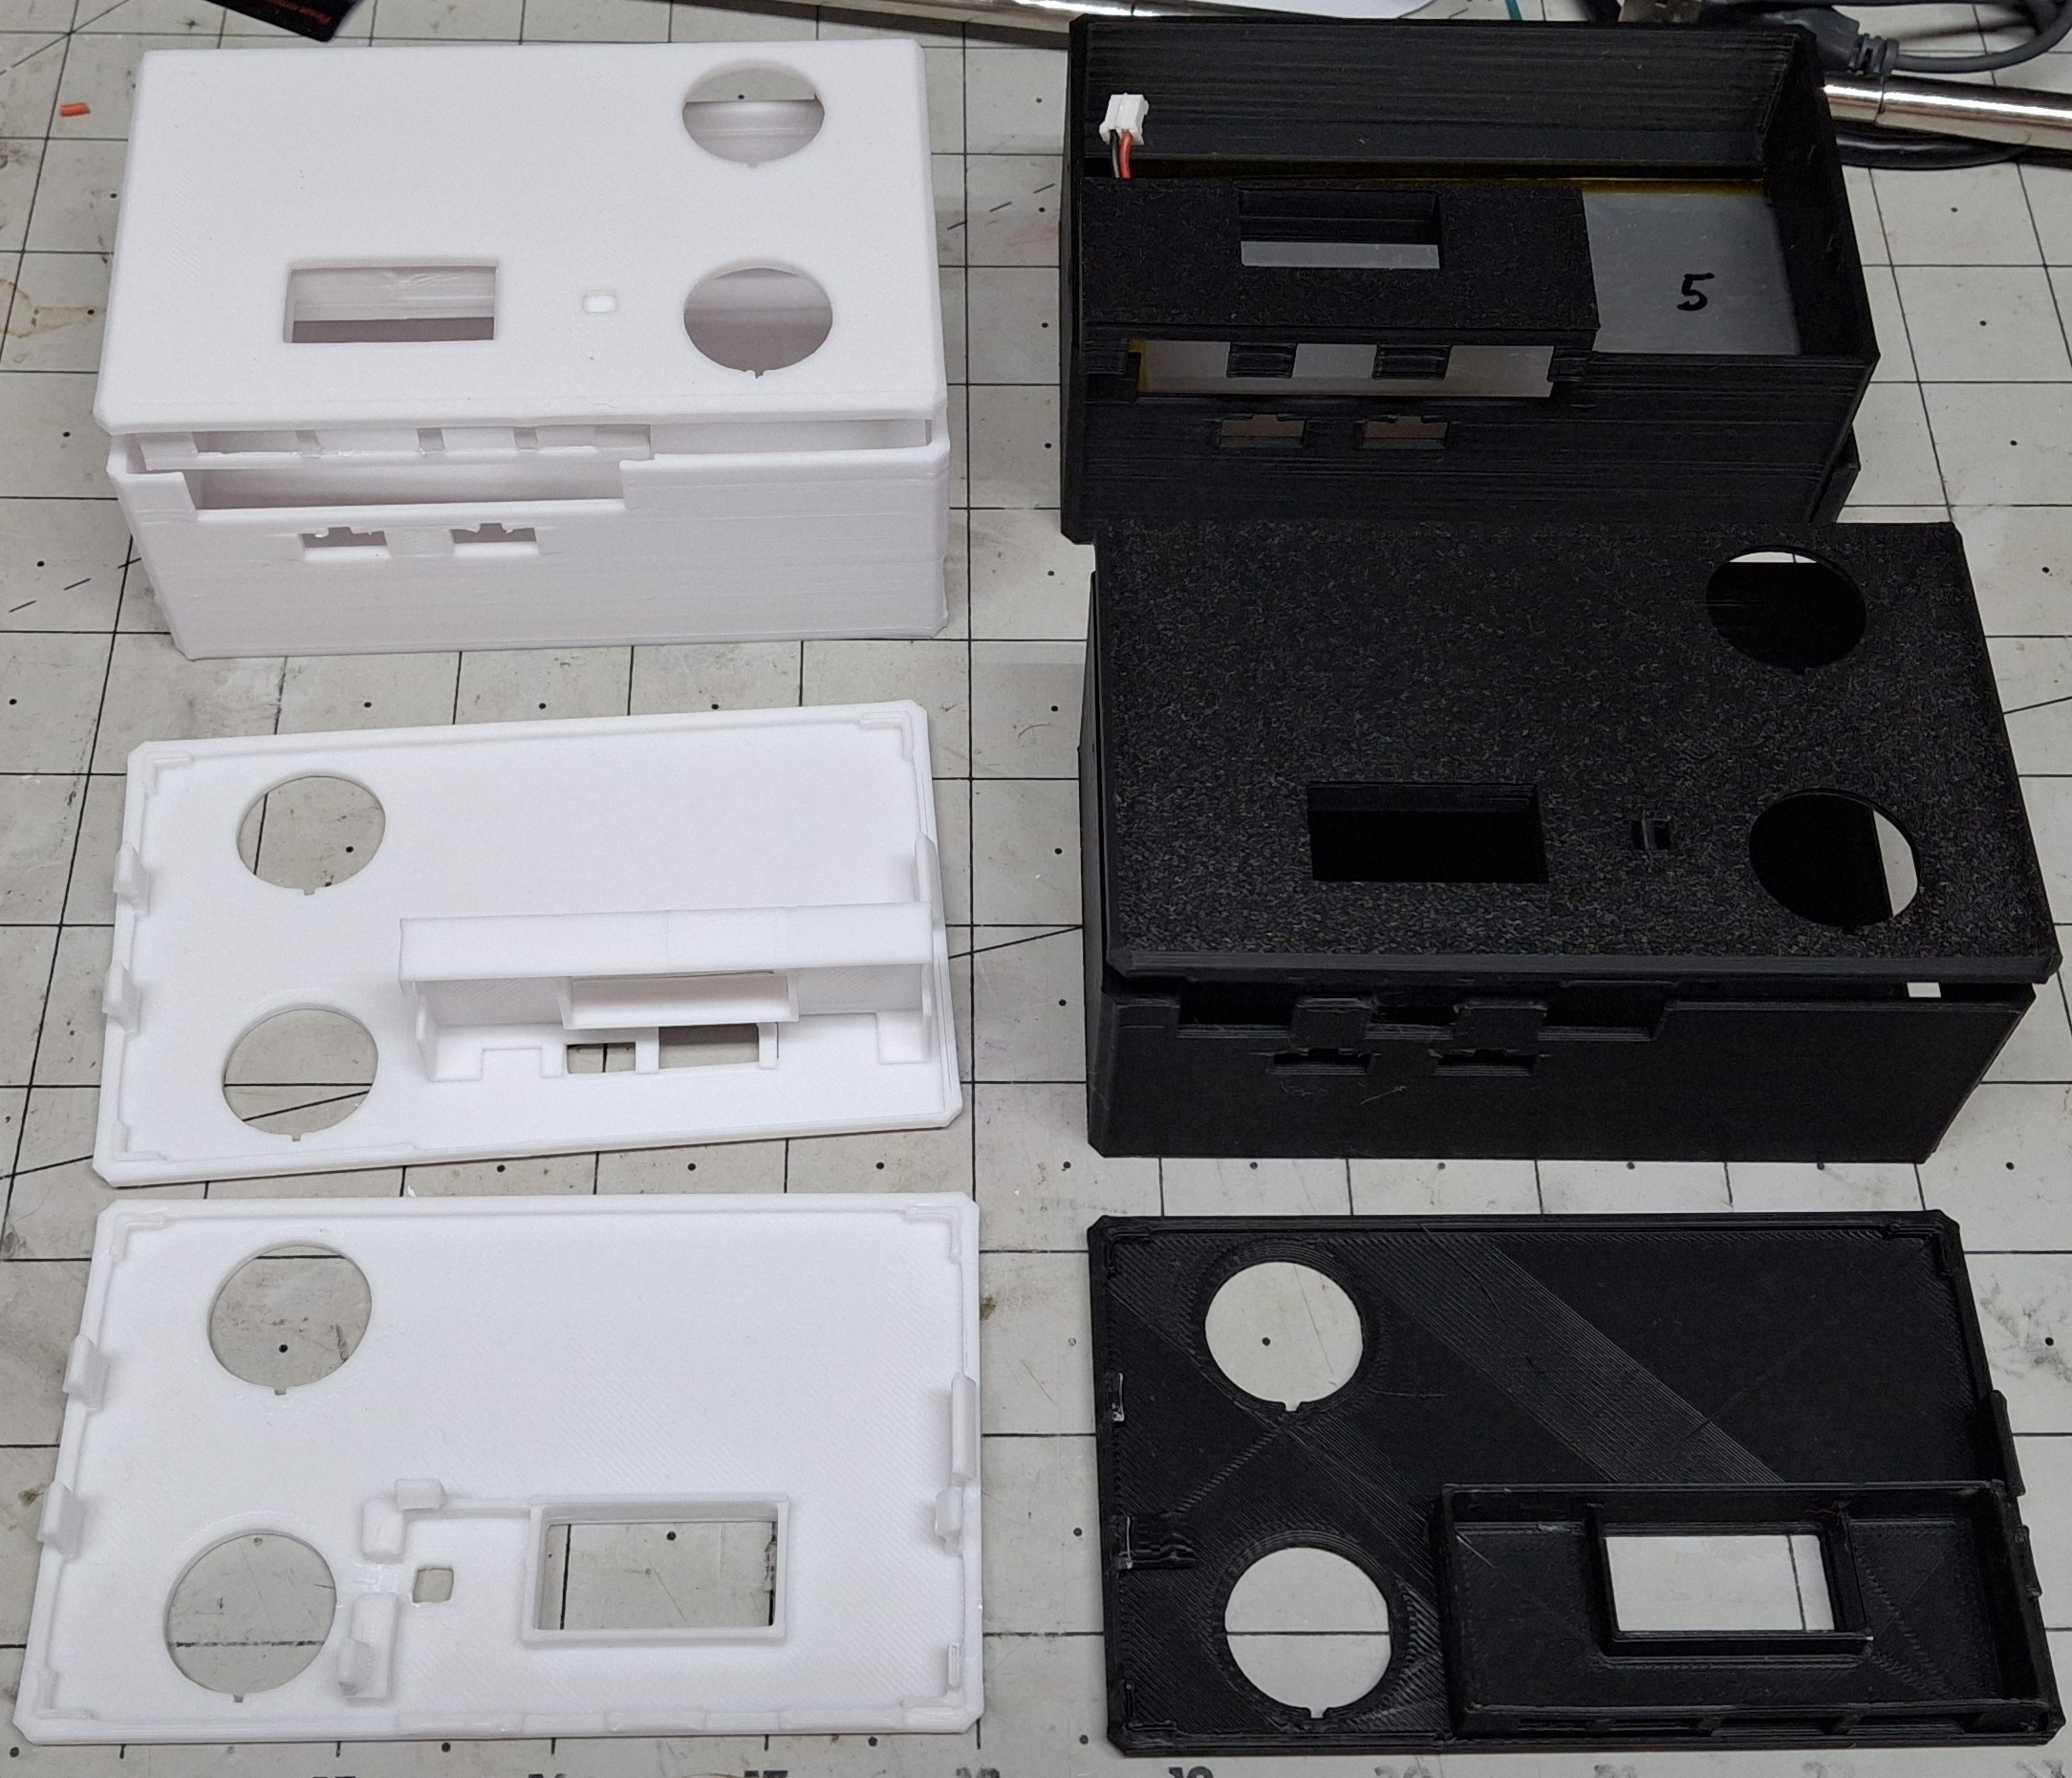
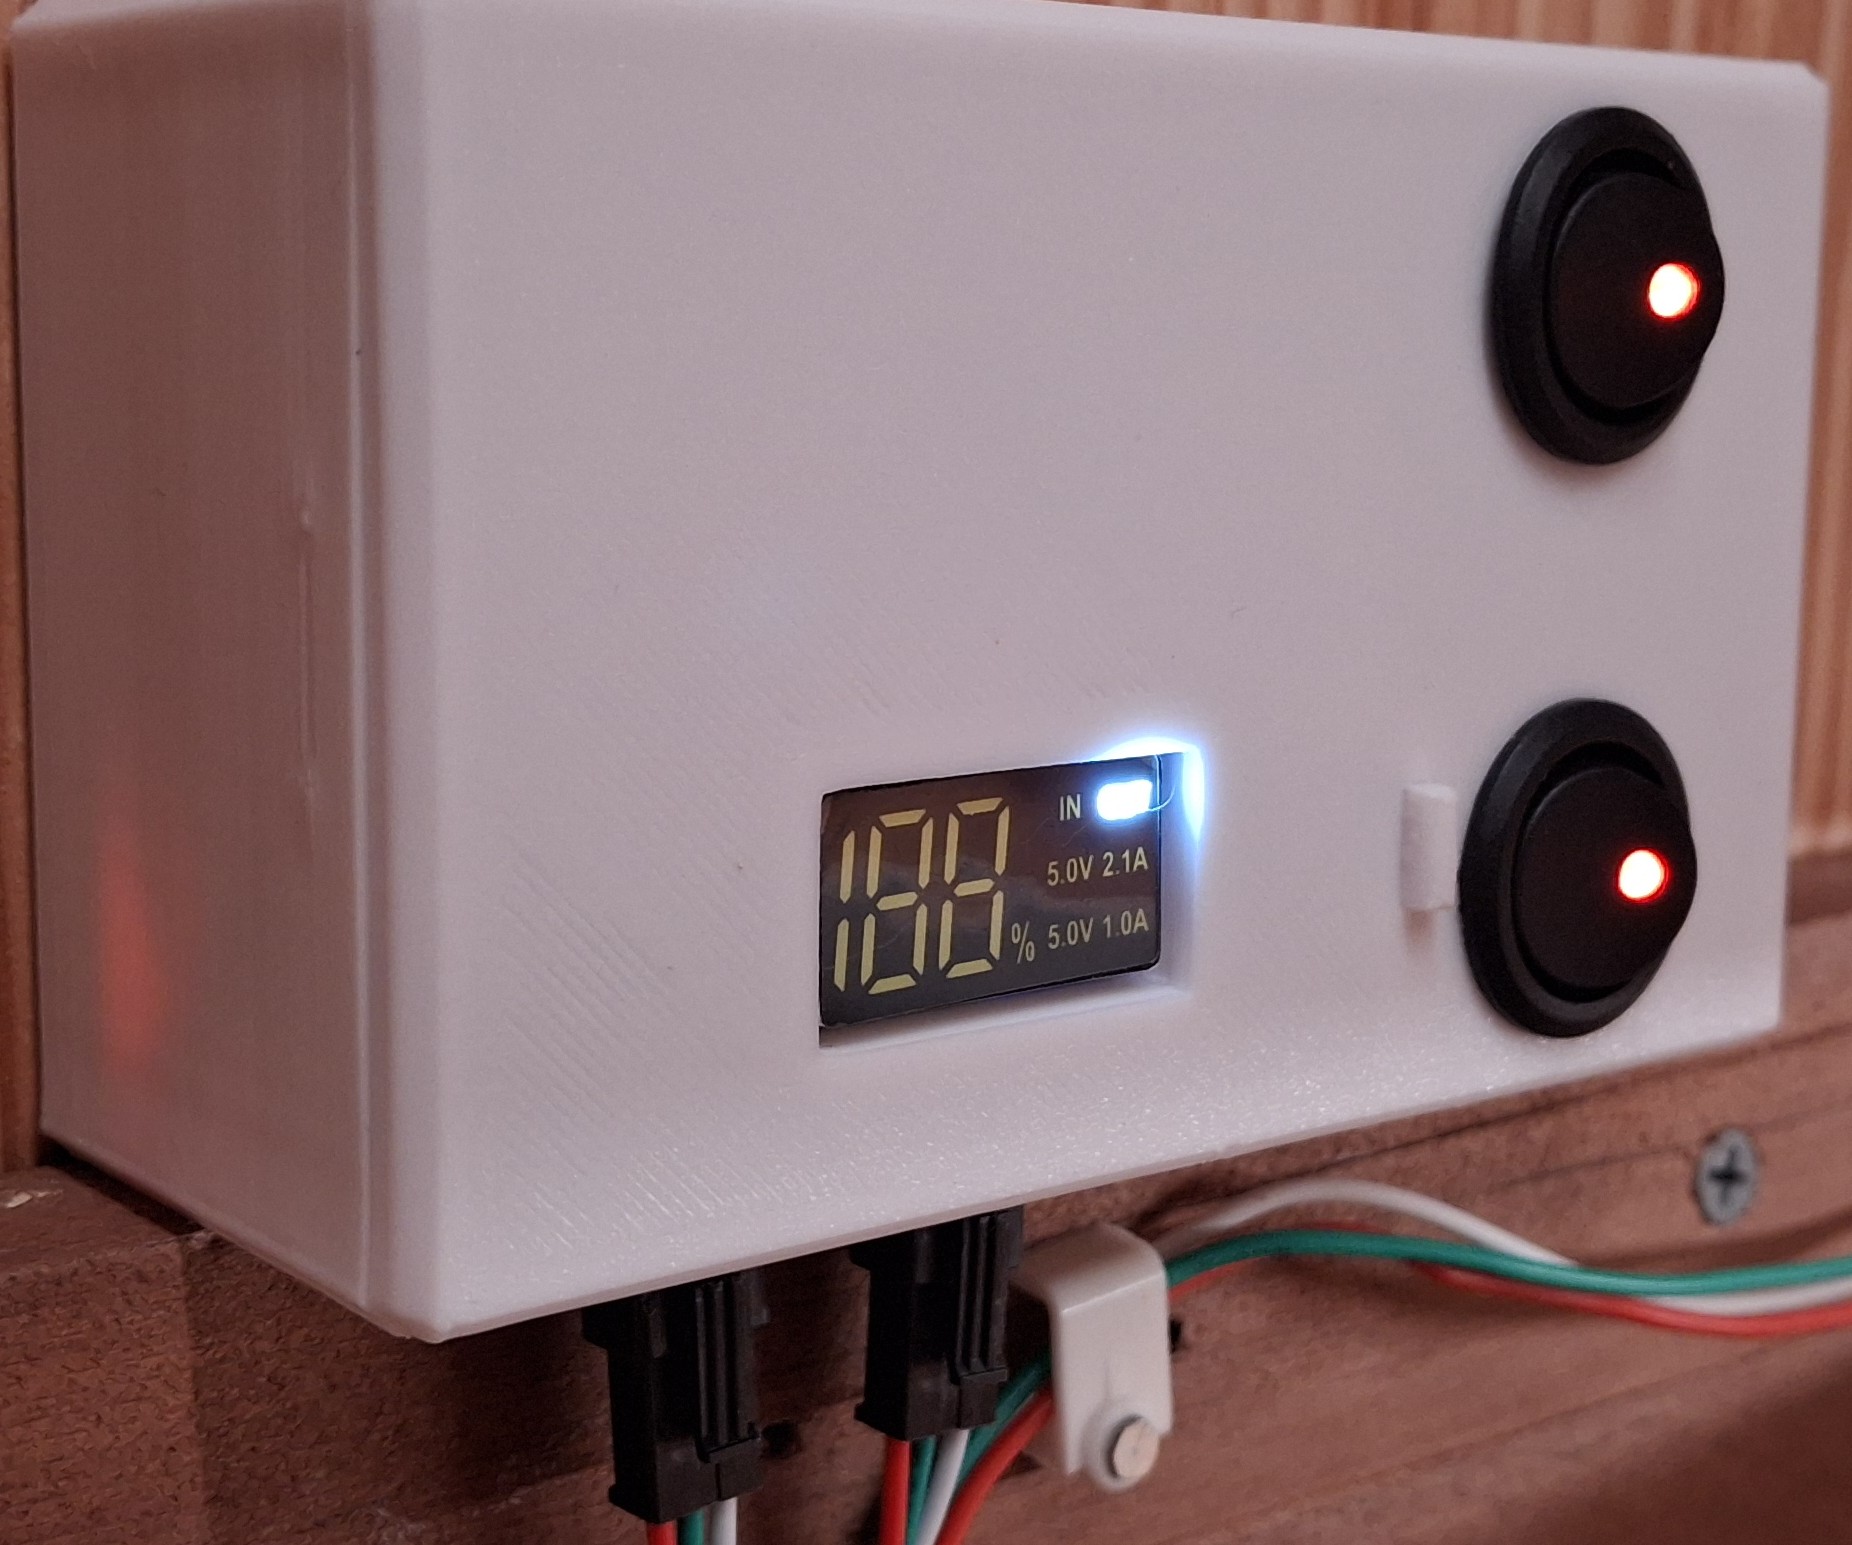
After printing countless iterations of both adapters, I reach the final designs. The case has an access “hatch” to allow sliding in that HUGE battery with a snap in cover to keep the battery from falling out. The lid provides openings for two round LED rocker switches to snap into.
The Final Design
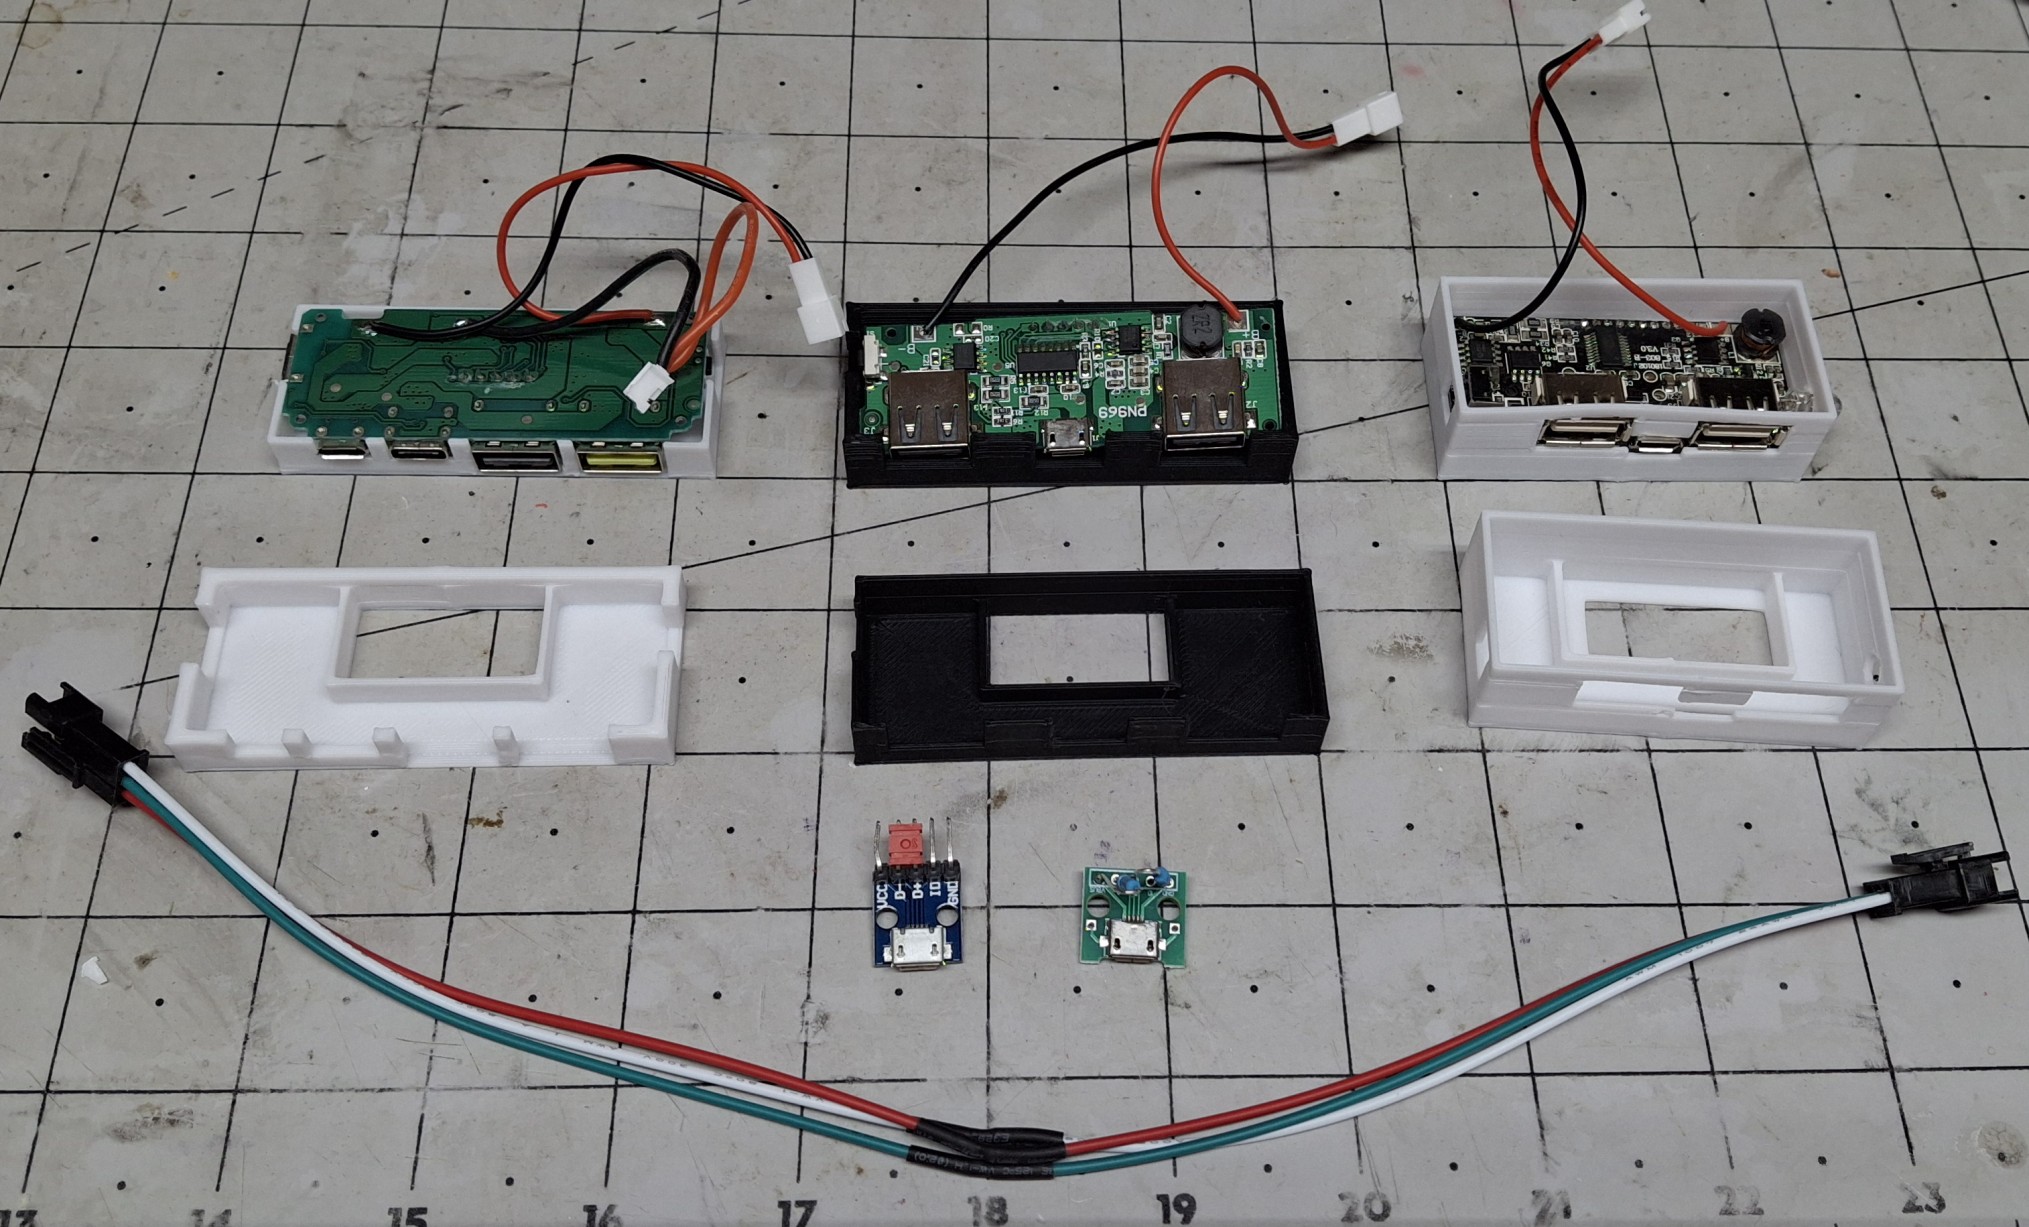
The final case design simply allows a generous opening for any port configuration of the chosen DCP. Previously the case and the lid both contributed to the port access closure. The adapter is now responsible to “form fit” and fill in around them. The case also provides openings to snap in two of the standard black three pin connectors these LED strips use.
There’s a bit of a story behind that, but I’ll try to keep it short. For initial fitment, I prefer to make small test prints that print quickly and allow fast turnaround adjustments to home in on the final sizing and spacing. But if I had the actual connector specs, I could shortcut the trial and error design effort even more.
After Googling a bulkhead style connector for way too long and getting nowhere, I finally realize the connector that’s attached to the LED strip has a set of snap in retainer arms already built in! DUH! But now the issue is I need that connector on the supply side from the Arduino, not the supplied side on the LED strip, so it can snap into the case opening.
Rather than rework or remake the LED strip and cabling that’s already in place, I decide to solder up and assemble an “adapter” cable. In other words, a “gender bender”, in the parlance of the ancient serial port connectors we used back in the day. A quick test proves it works as intended.
Trouble In Paradise
That’s not the last of the soldering necessary though. The rocker switches still need wired up to turn on two separate Arduinos. Two you say? Why two? Because there’s no way to wire the rocker switches to both provide power and act as an input to indicate which LED strip to energize, short of using blocking diodes and further complicating the design.
It’s the quickest way there, and considering I didn’t want to take the time to do any design on this to begin with, it’s certainly turned this into a much bigger project now. I have Arduinos to spare, but I don’t have time to spare to update the sketch to control two LED strips let alone read the inputs to determine which LED strip to control.
All the interconnects use the standard lithium cell connectors, with the polarity and connector style matching the battery setup. If it supplies power, e.g. battery or rocker switch, it uses that configuration. If it accepts power, e.g. DCP or Arduino, it uses the shroud configuration. That way eliminating a component to troubleshoot guarantees the correct fit.
So with everything buttoned up and ready to test, I plug in both LED strips and turn on the switches. Both turn on and really light up the inside of the closet. This is great. This is exactly what I wanted, a brightly lit closet so I can see what’s in there. No more working in the dark. But then everything turns off after a minute? Seriously? WTF?
Scratching My Head
Now I’m really scratching my head. My bench testing with an inline USB power monitor shows ~10mA per pixel, or ~300mA for the 30 pixel strip and ~250mA for the 25 pixel strip. This should be well within even the original 500mA USB current limit, but these DCPs are supposed to support 2.1A and 2.4A!
So now I’m wondering if it isn’t drawing enough current? How can that be? I can see if it was only a single LED, like 10mA – 20mA, but this is an obvious load. To test the theory, I grabbed the test fixture Arduino and LED strip and plug it into one of the USB ports. That seems to have solved the issue by adding another ~290mA load. Until it doesn’t…
I thought maybe it just needed the data connection to the test fixture Arduino setup to remain on, but when that failed too I decided to do some more research on how the USB connection actually works in this situation. That’s when I found the whole DCP thing, where shorting the two data pins together was supposed to tell it this is a DCP.
So for grins I grabbed one of the last micro USB breakout boards I had, shorted the data pins together, and plugged it into the USB connector on the DCP. Still no luck. More research and I found three more configurations to try with various resistor divider combinations on the data pins from power to ground.
It’s a Tomorrow Thing All Over Again
One configuration uses a 5.1KΩ / 10KΩ divider. Pretty sure I have those values in my resistor stash… That’s buried beneath three other storage bins and in the back behind another bin up on the shelf in the corner. It’s late, and rather than mess with it tonight I’ll just deal with it tomorrow. But tomorrow turns into the next day. And the next.
In fact, this whole episode stretched out over weeks before I even got to doing the research, and the entire time my progress with the closet ground to a halt. Making room for the most recent acquisitions in the closet is the goal here. The idea is to make room for all my bins strewn about here and there and everywhere on the cabinet at the foot of my bed.
That storage space on top the cabinet was occupied by those recent acquisitions stacked on top of it. I managed to get most everything stuffed in the closet, but there’s still more to be done there. Mission almost accomplished. Now I need the lights in the closet to stay on so I can see what I’m doing to try to fit the last of boxes of cars and whatnot in there.
The New Final Design
I called them the final designs earlier, but that’s no longer true. If memory serves, I scrapped using these for a project at work for the same reason, because they kept turning off after a minute. Let’s see how well the earlier version DCP works. This is where those battery connectors saved the day. It’s as easy as unplugging the one and plugging in the other.
I didn’t bother with dressing everything into the box before I knew whether it was going to work or not. By now I had already reworked the original cabling and put together a second for the new strip under the shelving. I set the whole mess on the shelf and plugged in the cable and turned everything on. And now we wait…
It works fine and continues to provide power as long as it’s switched on. Time to switch over to using that DCP. Unfortunately the only exception to my connector rule is the hardwired power feed to both rocker switches. The feed has a connector, but from there is hardwired between the two switches, and the wires must be cut to remove the switches.

The Old Switcheroo
So why do I need to take the switches out in the first place? Isn’t there an adapter for that style DCP? The answer is yes, but the adapter for the other style DCP is already glued to the lid of that box. Couple that with the broken retaining tabs on the lid and it’s time for the old switcheroo to another lid which requires the switches to be removed.
I already have another switch box more or less ready to go with the older style DCP, but it will need the power output connector attached while I’m soldering the power feeds back on the rocker switches, now moved to their new home. The old box was black, while this one’s white, not that it matters for controlling LEDs. More aesthetics than anything else.
I figure a white lid with a white case looks better than the mix match white lid with a black case. Besides, I’d have to print another black lid and I don’t want to waste the time doing so. With everything buttoned up I place the new switch box in place and connect the LED strips. Both strips light up right away, and more importantly, stay on until turned off.
No Longer Available
Unfortunately, I can’t get those older versions of the DCP anymore. I only had a few of them to start with, and once they’re gone, they’re gone. With the new versions not working as expected and being the finest quality Chinesium, there is absolutely no documentation for them.
And of course any markings on the control chip don’t turn up anything in a Google search either, where I was hoping to find a replacement that is still available. The battery protection chip shows up, but that’s about it. I may find an answer on how to strap or configure the new ones someday, maybe I’ll find something on the old ones missing on the new ones.
In any case, it works for now, and I have more pressing issues to deal with. Like making room for all my stuff still in the corner room over at the other house. That’s the motivation for getting the storage bins off the top of the short file cabinets. The idea is to then take everything off the old shelf unit sitting on them as well and stack them on top one another.
This will make room for the other tall file cabinet over here. I already have five large storage bins with HO scale stuff in them. I ordered four more large storage containers that will hopefully be enough for the rest of the already assembled buildings and yet unassembled kits.
I’ve already filled one with all my 3D printer filament and will filled another this morning.
The Ultimatum
Now that the kids have moved most of their stuff out of the other house, Ann’s ready to list it. She gave the kids the ultimatum of the end of August to have all their stuff out or kiss it goodbye. I got the same ultimatum. I told her that may be an unrealistic expectation, but agreed having a deadline is better than not having one.
I also told her I’ll do what I can to reach that goal, but be prepared to be disappointed if it doesn’t happen. My biggest concern is the motorcycles in the garage I still can’t get to. Then she sends me a picture of one of them in the driveway after Nick moved a bunch of stuff out of the way to do so.
I’m not sure why she told me not to touch any of the kids stuff in the garage or move it but all of a sudden Nick could move a bunch of their stuff. I think it was meant to say I didn’t need to worry about getting to the motorcycles more than contradict what I was originally told about moving the kids’ delicate stuff.
It helps to know they’ll help with them, but I still can’t get to all the boxes of spare parts on the shelves until the kids get the rest of their stuff out of the way. I can’t even start disassembling the work benches until they get all their shit off them. We have 40 year old teenagers, that need to be told every step, like they can’t think for themselves. ¯\_(ツ)_/¯
Expanding Storage
One way or another we need to expand our storage space, or at least I do, just to have room for everything. One option is renting temporary storage but I’d like to avoid that if at all possible. Most everything I would store there is climate sensitive and will rust or melt if it’s too hot or humid. That’s why the garage has its own dedicated split unit.
The garage is already crammed to the gills, but like the bookshelves in my office could be much better organized. To that end, I allocated the remaining two large storage bins to the garage and all the trestle making pieces sitting across the shelf over the carriage doors. I just ordered four more for the HO stuff at the other house.
I spent last weekend at the other house going through everything, sorting it as trash, garage sale, or keeper. Ann and Nick got all the trash out to the curb and placed all the things I labelled as garage sale in Esnel’s office. There’s still more sorting that needs done, but I accomplished most of it in one day. I’m keeping all my styrene model kits for when I retire.
All the HO building kits are now all together in the corner room closet, along with all the electronics sorted into several 6qt. and 16qt. storage bins. I had to move all the wood out of the closet left over from disassembling the lower part of the layout, placing it on the countertop now laying on the floor, left behind when we moved the beautiful cabinets out here.
Long Term Storage
Another Distraction
Between the Death Trap design from the previous post and now this new closet lighting controller design, I haven’t touched the switch casting design in months! I’m beginning to think it’s time to find a high school prodigy or three to employ to offload some of this workload. That or just retire so I have enough time to do this full time instead.
There’s a story there too. As much as I’d like to retire, Ann already has. She originally planned to officially retire in September, but as fate would have it, was forced to retire early. The company she used to work for was more interested in selling their services in the various “markets”, as they call them, than actually providing quality health care.
The last straw was the so called “team building” planned for Jupiter, FL. Supposedly an optional invitation, but it quickly became apparent it was mandatory. She’d have to travel there, along with her other management counterpart, and only one of their shared team of more than a dozen. Two managers for one team member? How does that make sense?
Early Retirement
When Ann said she wasn’t going to attend when they couldn’t give her a good reason why she needed to be there, other than “Because we said so”, she was fired. No severance. No professional send off. Nothing. She wasn’t treated like she’d been a key contributor, but rather summarily dismissed, because “Fuck you, that’s why”. Their Loss.
Her team was told her last day was today and that’s all they were told. Talk about a piece of shit company. I told her she should sue them, but Florida being a “Right to Work” state means your employer has the right to make you work your @$$ off for them. You have no rights as an employee. It’s a Red State thing. Google it.
But that’s enough politics. The moral of the story is Ann’s now retired, ready or not, thanks to the greedy, heartless fucks she used to work for. And as much as I’d like to be retired, I have at least another year and a half, just so we both have affordable health insurance. Talk about being held hostage by employment…